
By popular demand, here is the recipe for the bubble tea cake I made a few weeks ago.
I want to try out new baking techniques and the best way I can do this is to use my family as guine pigs. So every major family members birthday, I like to make them birthday baked treat. This is what I came up with for my brother’s birthday, (and also happened to coincide with our small Eid celebrations).
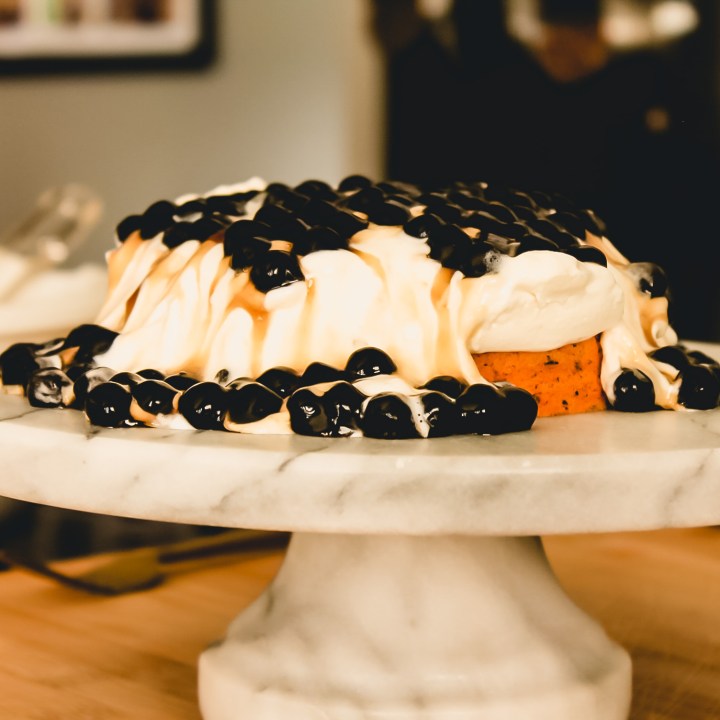
It is no surprise that my love for bubble tea runs deep. There is something about the chewy soft boba aka tapioca pearls that has me so addicted to this popular taiwanese drink. I thought I would transform that chewy creaminess into a cake, by topping a light and airy chiffon cake with some whipped topping and tapioca pearls, to give it that ‘bubble tea’ vibe.
But let me be clear. There is nothing easy or quick about this recipe. This recipe was a challenge. I made loads of mistakes along the way. And learnt a lot! (FYI tapioca pearls in cold water turn into a congealed mess! They need boiling hot water to keep their shape!)
Chiffon cake is not an easy one. And it is best made the day before, so this one takes time! But the end result was so delicious I really want to make this again. So let’s call this a ‘hard but worth the effort’ sort of recipe.
After my IGTV and IG stories post about this, many of you asked for the recipe to be posted on the blog. So here it is! I’m excited to see you recreate it too! Don’t forget to tag me if you do!
The chiffon cake is flavoured with thai iced tea leaves, you can use whatever tea flavour you like. I personally really enjoy this brand of thai iced tea which you can find on amazon or at your local Asian tea supplier if you are lucky enough to have one close by (we are, and it is like 1/4 the price of amazon so its worth searching for one in your area). I started with Justonecookbooks recipe for earl grey chiffon cake, and then modified it for the thai tea flavour I was going for and reduced the sugar – cause you know thats what I do.
For the toppings I tried to emulate a bubble tea drink with a creamy cheese foam and boba. I created a simple salty whipped cream topping using whipping cream and bit of cream cheese and salt. And of course I had to make some classic large tapioca pearls (boba) which I found at my local asian grocer. I went for the traditional black pearls, but again feel free to get whatever colour you like. Or go here to make your own boba!
To serve this cake, I fitted with a cake collar to help keep the topping ingredients on top of the cake, then layered the whipped topping onto the cake, added a generous amount of the cooked (and cooled) boba on top, and then gathered everyone around to pull off the cake collar straight up in as dramatic a fashion as I could! The pearls and whipped topping should come cascading down the sides of the cake (and cake stand) in a delicious mess. It is so fun to watch! And even more fun to eat!
If you are going to make this, some things to keep in mind: while you can make the cake the day before, you will want to make the toppings and assemble the cake right before you want to serve it. Boba are best when eaten fresh. If they sit for too long or are refrigerated they tend to harden, and just loose the fun soft chewy quality that they have. The maximum you can keep boba after cooking them is about 5 hours at room temp. So plan accordingly!
The assembly takes a bit of finesse but the final product is worth it!
Enjoy!

Bubble Tea Cake
Ingredients
For the Thai Tea Chiffon Cake
- 1 tbsp thai tea loose tea leaves (to grind)
- 2 tsp thai tea loose tea leaves (to brew)
- 6 tbsp hot water
- 3 large eggs, separated (keep chilled)
- 80 g sugar
- 3 tbsp canola or vegetable oil
- 75 g cake flour (see notes for all an purpose flour substitute)
- 1 tsp baking powder
For the Salty Whipped Cream Topping
- 1 cup whipping cream
- 1 tsp vanilla essence
- 1/4 cup cream cheese (room temperature)
- 1 tsp salt
For the Tapioca Pearls
- 1 1/2 cup large tapioca pearls (about 8-10oz)
- 10 water
- 2 tbsp brown sugar
Instructions
- Preheat oven to 340F (170C). You will also need a chiffon cake pan or 7 to 10" aluminum spring-form pan (I do not recommend a non-stick or other material pan). Do not grease the pan – the batter needs to stick to the sides of the pan as it bakes.
- Put 1 tbsp of the tea leaves in a heat proof bowl or measuring cup, and add 6 tbsp hot water. Set aside to steep. Once cooled, remove the tea leaves and measure out 4 tbsp of the steeped tea. Set aside.
- Take 2 tsp of the tea leaves and blend in a food processor or use a mortar and pestle to grind to a fine powder.
- Separate the 3 egg whites and yolks – make sure your egg whites stay cold – this will help your cake get a good rise in the oven.
- In a large bowl, add the egg yolks and add 1/3 of your 80g of sugar. Whisk together. Set aside.
- Add the 4 tbsp steeped tea, 3 tbsp oil and the powdered tea leaves. Whisk to combine.
- In three batches, sift in the 75g of cake flour and 1 tsp baking powder, whisking well after each addition. Make sure there are no lumps. Set aside.
- Using a stand mixer and a clean bowl (make sure it is clean, or your egg whites won't whip properly!), whisk the cold egg whites on medium speed till they start to get foamy and bubbly (about 30 seconds). Add 1/3 of the sugar and continue whisking.
- Keep whisking and adding sugar a little at a time. Turn the speed to high and whisk till stiff peaks form (about 5 minutes total). You can test for stiff peaks by dipping the whisk in the egg whites and if it stays standing and just the tip takes a tiny bow. It should hold its peak shape.
- Using a spatula, gently fold in the egg whites into the prepared cake batter in 2 -3 increments. Making sure there are no white streaks of egg white after each addition, but also don't over mix it or you will loose all that air.
- Once the egg whites are mixed into the batter, carefully pour the batter into a cake pan. Try not to swirl the batter round to pan. Just pour into one spot and let the batter slowly fill up the pan. This will also prevent air pockets from forming.
- Give the pan a few gentle taps on the counter to release any remaining air bubbles. And run a toothpick through the batter, again to release any trapped air bubbles. This will ensure an even rise.
- Bake in the preheated oven for 30-35 minutes. Careful not to over cook the cake (if it looks like it is starting to brown on top, loosely cover with some aluminum foil to finish baking it). When it is done, it will be set on top, and a clean toothpick inserted into the centre should come out clean.
- As soon as you take this out of the oven, you will need to turn the pan upside down and let the cake cool upside down. Place it on a baking rack, or perch it on two mugs to hold it up and not squish the top of the cake. It will shrink a bit, but it should not have any big indents in the top of the cake.
- Allow to cool completely, then use a spatula to carefully loosen the edges from the sides of the cake and remove the sides of the pan.
To make the Salty Whipped Cream
- In a stand mixer, whip 1 cup whipping cream and 1 tsp vanilla essence till it forms stiff peaks (about 5 minutes on high speed).
- Add 1/4 cup room temperature cream cheese and 1 tsp salt and whip till just combined.
To make the Tapioca Pearl Topping*
- In a large saucepan bring 10 cups of water to a boil.
- Add 1 1/2 cup tapioca pearls. Stir and turn the heat to medium. Allow the pearls to simmer for 30 minutes. Stirring occasionally.
- After 30 minutes, turn off the heat and cover the pan. Cover and let the pearls soak for another 30 minutes off the heat.
- Strain the tapioca pearls into a large bowl. Add 2 tbsp brown sugar, or more if you want them a bit sweeter. Give them a stir. Make sure they are cooled to room temperature. If they cool down too much and are too firm, add a splash of hot water to loosen them up again (do not refrigerate! It will change the texture of the boba!). Now you are ready to assemble the cake.
Assemble the Cake
- Place your chiffon cake on a cake stand or your serving plate.
- Use a cake collar to encompass the circumference of the cake. Use a bit of tape to secure it in place. You want it to sit pretty snug so the cream doesn't drip down the sides of the cake till serving time and it should rise about 2-3 inches above the cake to hold in the whipped topping.
- Pour the salty whipped cream on top of the top of the cake in a thick layer. The cake collar should hold it all in and it should not drip down the sides.
- Top with the tapioca pearls (make sure they are not too hot!).
- To serve, gather everyone around and get your camera ready to capture the action! 😉 Gently but firmly, pull off the cake collar in an upward direction in one motion. Watch as the cream and tapioca pearls cascade down the sides of the cake. Its so mesmerizing!
- Slice and serve immediately! This one is best eaten right away as the boba will not keep in the refrigerator. The cake itself can keep for up to 5 days if refrigerated.
3 thoughts on “Bubble Tea Cake”