
Hello 40!
Yup I turned 40 this week (on the 17th!)! And despite it being a covid birthday. I did my best to make the most of it. We (virtually) partied, ordered our favourite takeout and I baked myself my own birthday cake! What do you think?

Originally the plan for this year was do a big getaway with my girlfriends who also turned 40 this year. Obviously that pesky worldwide travel ban put a damper on that idea, so we hit pause on the girls trip and also decided we are not turning 40 this year. We will just wait until next year. So in anticipation of turning 40 again next year, I guess this is my -I’m not 40 yet – birthday cake!
My inspiration for this cake was a mango vanilla cake that I had at my wedding over 11 years ago. Honestly, I didn’t even want a cake at our wedding. It wasn’t something I cared for. I mean its just cake right? But his mom insisted we had to have cake! How can we get married and not cut a cake?! And so we did. Let me tell you, I still think about that cake to this day! It was one of the best tasting things we had! I dream of that mango buttercream! It tasted almost like a rich mango ice cream in icing form. It was a beautiful cake. But gosh the flavour is what really got me. So I wanted to try to emulate it at home!
This is a close second to that cake. Obviously the real deal was better, but I think I managed to pull off a really good knock off. If you love mango then this is the cake for you!
Better than Boxed Cake Mix -Vanilla Cake
For the vanilla cake I adapted my favourite vanilla cupcake recipe and made a three layer 7-inch round cake. You can use a boxed cake mix if you like, but honestly it doesn’t take much more time to make this cake from scratch and the flavour is ten times better than any boxed cake mix I have every tried! The end result is a rich vanilla flavoured sponge cake that works well in both cupcake and cake form. A great base for the mango buttercream!
Pistachio Butter Layers
In between the layers of cake I added a generous slather of pistachio butter for an extra something-something. I find pistachio butter at my local European grocery store (its normally where the Nutella or other nut butters are). It is also on Amazon, but I find it a bit pricey (at least in Canada). If you can’t find it, you can totally just skip it or try cashew butter. Or just add more mango buttercream between the layers. But if you can manage to get your hands on pistachio butter, it will really take the flavour of your cake over the top!

Simple Mango Buttercream
This is really the star of the show! A basic buttercream is made using salted butter. I find that the salt helps cut through the sweetness of the icing sugar and really makes for a better tasting buttercream. The mango flavour comes from mango pulp. I like using canned kesar mango pulp which I find at my local asian grocers. If you can’t find canned mango pulp, you can blend the flesh of two fresh mangoes. It might affect the end flavour though, as I find the canned pulp tends to have a much more intense mango flavour than fresh mangoes.
Fault Line Cake Decorating Tips
To decorate the cake I decided to try my hand at a fault line cake decorating style. I followed this video. The key is to work in layers and allow each layer of icing to cool before adding the next so it doesn’t all turn to mush!
To start, I layered the cakes with a generous slather of pistachio butter between each layer. Then I covered the whole thing in a thin layer of mango buttercream to form my ‘crumb’ coat. I allowed this to cool for at least half an hour in the fridge so that the icing had a chance to harden. This helped make the next step go by much smoother (pun intended!).
Next came the middle layer. I spread a generous layer of mango buttercream over the centre of my cake. Making sure not to spread it to far to the edges. I used a plastic bench scraper to smooth the icing all around. I didn’t worry too much about making the edges clean or straight (they get covered up at the next step anyways). Next I placed the cake in a large baking pan or plastic tub to catch the sprinkles and carefully added sprinkles to the middle icing layer using my hands, making sure it was well covered and sparkly! I wish I had a more variation of sizes of sparkles but purple sugar sprinkles is what I had on hand, so that is what I used. Again I allowed it to set in the refrigerator for about an hour.
Next I added the mango buttercream to the top and bottom of the cake. This layer has to be quite thick as it needs to overlap over the sparkly middle layer and create that ‘fault line’ effect. I used my bench scraper to smooth out the top and bottom side layers and also I covered the top with the buttercream and made sure the edges were nice and clean. Once again I let this set in the fridge for about 30-minutes.
For the final touches I used some edible gold dust, which I found on amazon, to add sparkle to the edges of the fault lines. I mixed half a teaspoon of edible gold with a tsp of water (FYI alcohol works better, if you are ok with using that, and it evaporates leaving gold glitter behind!). Using a paintbrush I painted on the gold edges. It almost has a geode look to it which I love! I will definitely be doing this look again!
I also used the gold paint to write on top of the cake. This was so much fun to do! What do you think?
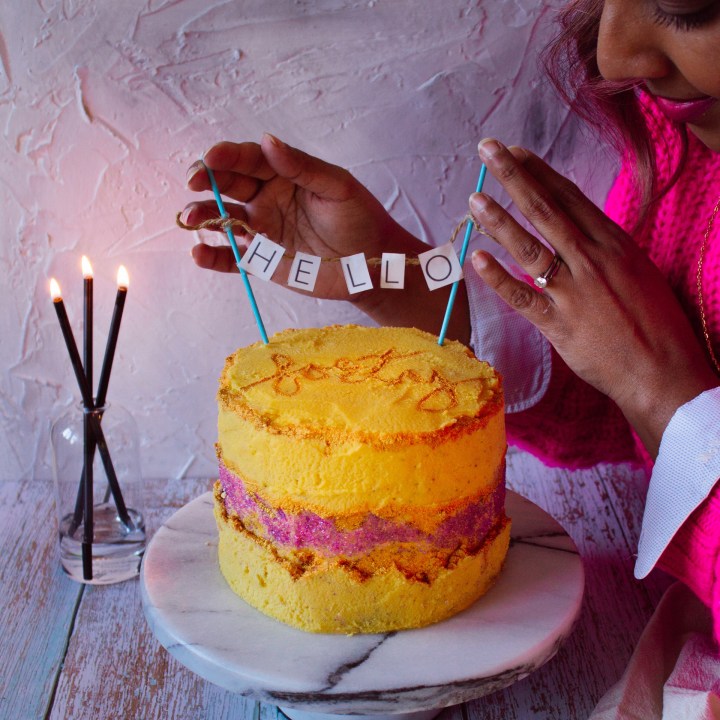
Finally I made a quick cake topper by printing out the letters for ‘hello’ onto some paper and gluing them to some twine and these cute sticks to finish off my ‘Hello forty’ cake! I love how it turned out! I almost did not want to cut into it!
And trust me when I say this cake turned out DELICIOUS! It is truly as good as it looks!
Let me know if you try making this vanilla cake with pistachio butter and mango buttercream! I want to see how you decorate it!

Vanilla Cake with Pistachio Butter and Mango Buttercream
Ingredients
Vanilla Cake
- 2 cups all purpose flour
- 1 1/2 tsp baking powder
- 1/2 tsp baking soda
- 1/2 tsp salt
- 2/3 cup sugar
- 1/2 cup salted butter (room temperature)
- 1 1/2 tsp vanilla extract
- 4 large eggs (room temp)
- 1 1/2 cup buttermilk (or sub 1/2 cup yogurt and 1 cup water mixed well)
Mango Buttercream
- 1 1/2 cups salted butter (room temperature)
- 4 cups icing sugar
- 1/2 cup mango pulp (canned kesar mango pulp recommended)
Instructions
For the Vanilla Cake
- Pre-heat oven to 350F. Grease three 7-inch round cake pans (or whatever shape pan you want to use). Add a layer of parchment paper on the bottom.
- Mix flour, baking powder, baking soda, and salt in a medium sized bowl. Set aside.
- Use a stand mixer with a whisk attachment to whisk the room temperature butter, sugar and vanilla extract till smooth and creamy. About 8 minutes. Make sure you stop the mixer halfway and scrape down the sides.
- One at a time, add the eggs and mix well before adding the next egg. Beat till fully blended.
- Remove the bowl from the mixer and using a spatula gently fold in 1/3 of the flour. Add 1/2 of the buttermilk and again fold in. Add 1/3 of the flour. Gently fold in till just mixed, add the remaining butter milk and gently fold in. Add the remaining flour and gently fold in. Do not over mix. You will end up with a slightly lumpy looking batter, but it should not have any dry pockets of flour.
- Gently pour in 1/3 of the batter into each cake pan. Give the cake pan a gentle tap on the counter to release any trapped air bubbles and place in the oven.
- Bake for 30-35 minutes until the tops are firm and bounce back when gently pressed, and a toothpick comes out clean when inserted into the cake.
- Let them cool in the pan for 10 minutes before turning them out onto a baking rack to cook completely. Ideally overnight.
For the Mango Buttercream
- In a stand mixer with a paddle attachment, start mixing the room temperature butter till smooth. About 4 minutes.
- Add the icing sugar a cup at a time and mix on low speed (to avoid an icing sugar explosion everywhere!). Continue adding icing sugar and mixing, scraping down the sides of the bowl after each addition.
- Add the mango pulp and mix well to combine.
- Refrigerate till ready to use. Before icing your cake make sure to allow it to come to room temperature for half an hour and give it a quick whisk to get it nice and smooth.
- Add icing to your cake as desired. The cake will keep for a few days at room temperature, but after that I recommend refrigerating.


